 When I was a kid, each week we would make a trip to the local bread store outlet to get our bread for the week at a much cheaper price than the supermarket. Whenever I went with my dad, I would always get to pick out one treat to bring home along with one of those instant chicken noodle mixes that I would have for dinner that night. Despite the broad selection of goodies, I usually always selected the Hostess Chocolate Cream cupcakes. As much as these were my favorite, I started to steer clear of them as a young adult when I learned the reason they stay good and moist for weeks on end. Seeing as I am trying to eat clean and teach my daughter the same healthy habits I refuse to buy the commercial Hostess brand.
 When Hostess went temporarily out of business awhile back there became a huge demand for their products. Instead of paying the outrageous prices that were being set on auction sites like Ebay, many set to recreate their own at home. Even though the Hostess favorites have since returned to the shelves for purchase, I still wanted to give a homemade version a shot just to revel in the old memories without all the chemical additives. These cupcakes turned out even better than I ever remember and making them not only brought back old memories but created new ones as I baked them with my toddler.
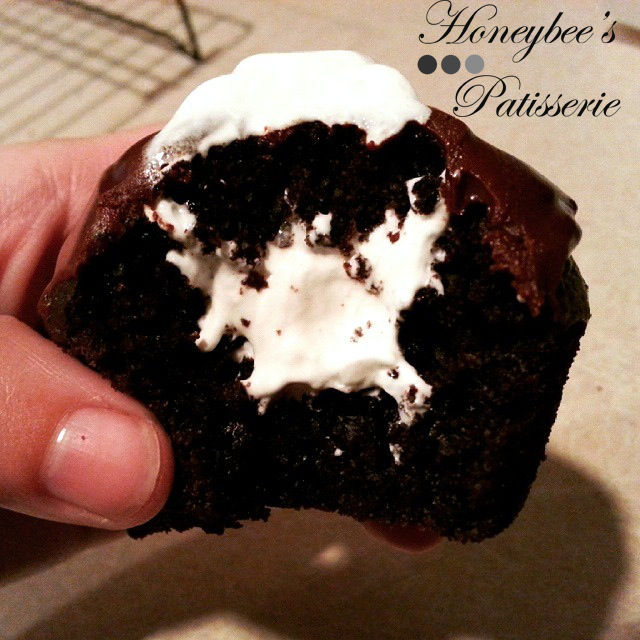 Now I won’t deny these cupcakes were rather tedious to make and what seems to be a simple mistake that couldn’t do much harm can turn into disaster if you are not careful. For example, most people will fill a cupcake using a piping bag and shoot the filling into the bottom of the cupcake. This method works fine with most cupcakes and have done it myself in the past. Problem is, if you do that with these cupcakes you will cause a blow out that you will notice even with the glaze on top. The reason you can’t fill the cupcakes the “easy way” is because the texture is too delicate. I recommend cutting out a little portion from the top, filling with a spoon, and then placing the top back on to avoid any problems. Another area that can cause a lot of problems is when you go to prepare the filling. The filling may get the perfect flavor from the marshmallow fluff, but it gets the proper texture from gelatin. The gelatin can also make the worst filling if not prepared properly. If you don’t sprinkle the gelatin over the water and allow it to dissolve a bit, you will end up with hard pellets in your filling. Gross I know. Another tricky part is when cooling the filling after microwaving it. You only need to cool the filling slightly, not completely before adding the marshmallow fluff. If the filling mixture is too cold when adding the fluff it will turn lumpy and be impossible to pipe curlicues on the top with the piping bag. On the opposite end of the spectrum, if the filling is still too hot when you mix in the marshmallow fluff, you will end up with filling that is too loose and runny. If this occurs the filling will mostly absorb into the cupcake and the curlicues won’t hold their shape on top. If you take caution when preparing these particular steps you will surely be successful.
 NOTE: Be sure you purchase Marshmallow Creme, such as Fluff or Kraft Jet-Puffed Creme and not marshmallow sauce used for ice cream. If you make the mistake your filling will not set properly. Be sure to bloom the cocoa with boiling water so that you get depth of chocolate flavor and prevent the chocolate chips from leaving unwanted, unmelted bits to tarnish the desired creamy mixture. The following recipe yields 12 cupcakes.
Homemade Hostess Chocolate Cream Cupcakes
Cupcake Ingredients:
- 1 cup All-Purpose Flour
- ½ tsp. Baking Soda
- ¼ tsp. Salt
- ½ cup Boiling Water
- 1/3 cup Dutch-Processed Cocoa Powder
- 1 tbsp. Instant Coffee
- ¾ cup Granulated Sugar
- ½ cup Sour Cream
- ½ cup Vegetable Oil
- 2 Eggs
- 1 tsp. Vanilla Extract
Filling Ingredients:
- 3 tbsp. Water
- ¾ tsp. unflavored powdered gelatin
- 4 tbsp. (½ stick) Unsalted Butter; softened
- 1½ tsp. Vanilla Extract
- Pinch of Salt
- 1¼ cups Marshmallow Creme (Fluff)
Glaze Ingredients
- ½ cup Semisweet Chocolate Chips
- 3 tbsp. Unsalted Butter
Formula:
FOR THE CUPCAKE BATTER: Heat the oven to 325°. Grease a 12-cup muffin tin with cooking spray and set aside. In a large bowl, combine the flour, baking soda, and salt. Set aside. In another large bowl, whisk together the boiling water, cocoa, chocolate chips, and coffee until smooth. Add the sugar, sour cream, oil, eggs, and vanilla. Mix until well combined. Add in the flour mixture and whisk until incorporated. Divide the batter evenly among the muffin cups. Bake cupcakes until toothpick comes out with a few crumbs attached, about 18 to 23 minutes. Cool the cupcakes in the tin for about 10 minutes, then remove cupcakes from the tin and allow to cool completely on a wire rack.
FOR THE FILLING: Combine the water and gelatin in a bowl and allow to sit until the gelatin softens, about 5 minutes. Microwave the mixture until it bubbles around the edges and gelatin fully dissolves, about 30 seconds. Add the butter, vanilla, and salt and mix until just combined. Allow the mixture to cool until still slightly warm to the touch, about 5 minutes. Whisk in the marshmallow creme until smooth. Refrigerate the mixture until set, approximately 30 minutes. Measure out 1/2 cup of the marshmallow filling and transfer to a piping bag fitted with a small, plain round tip. Reserve the remaining marshmallow mix for filling the cupcakes.
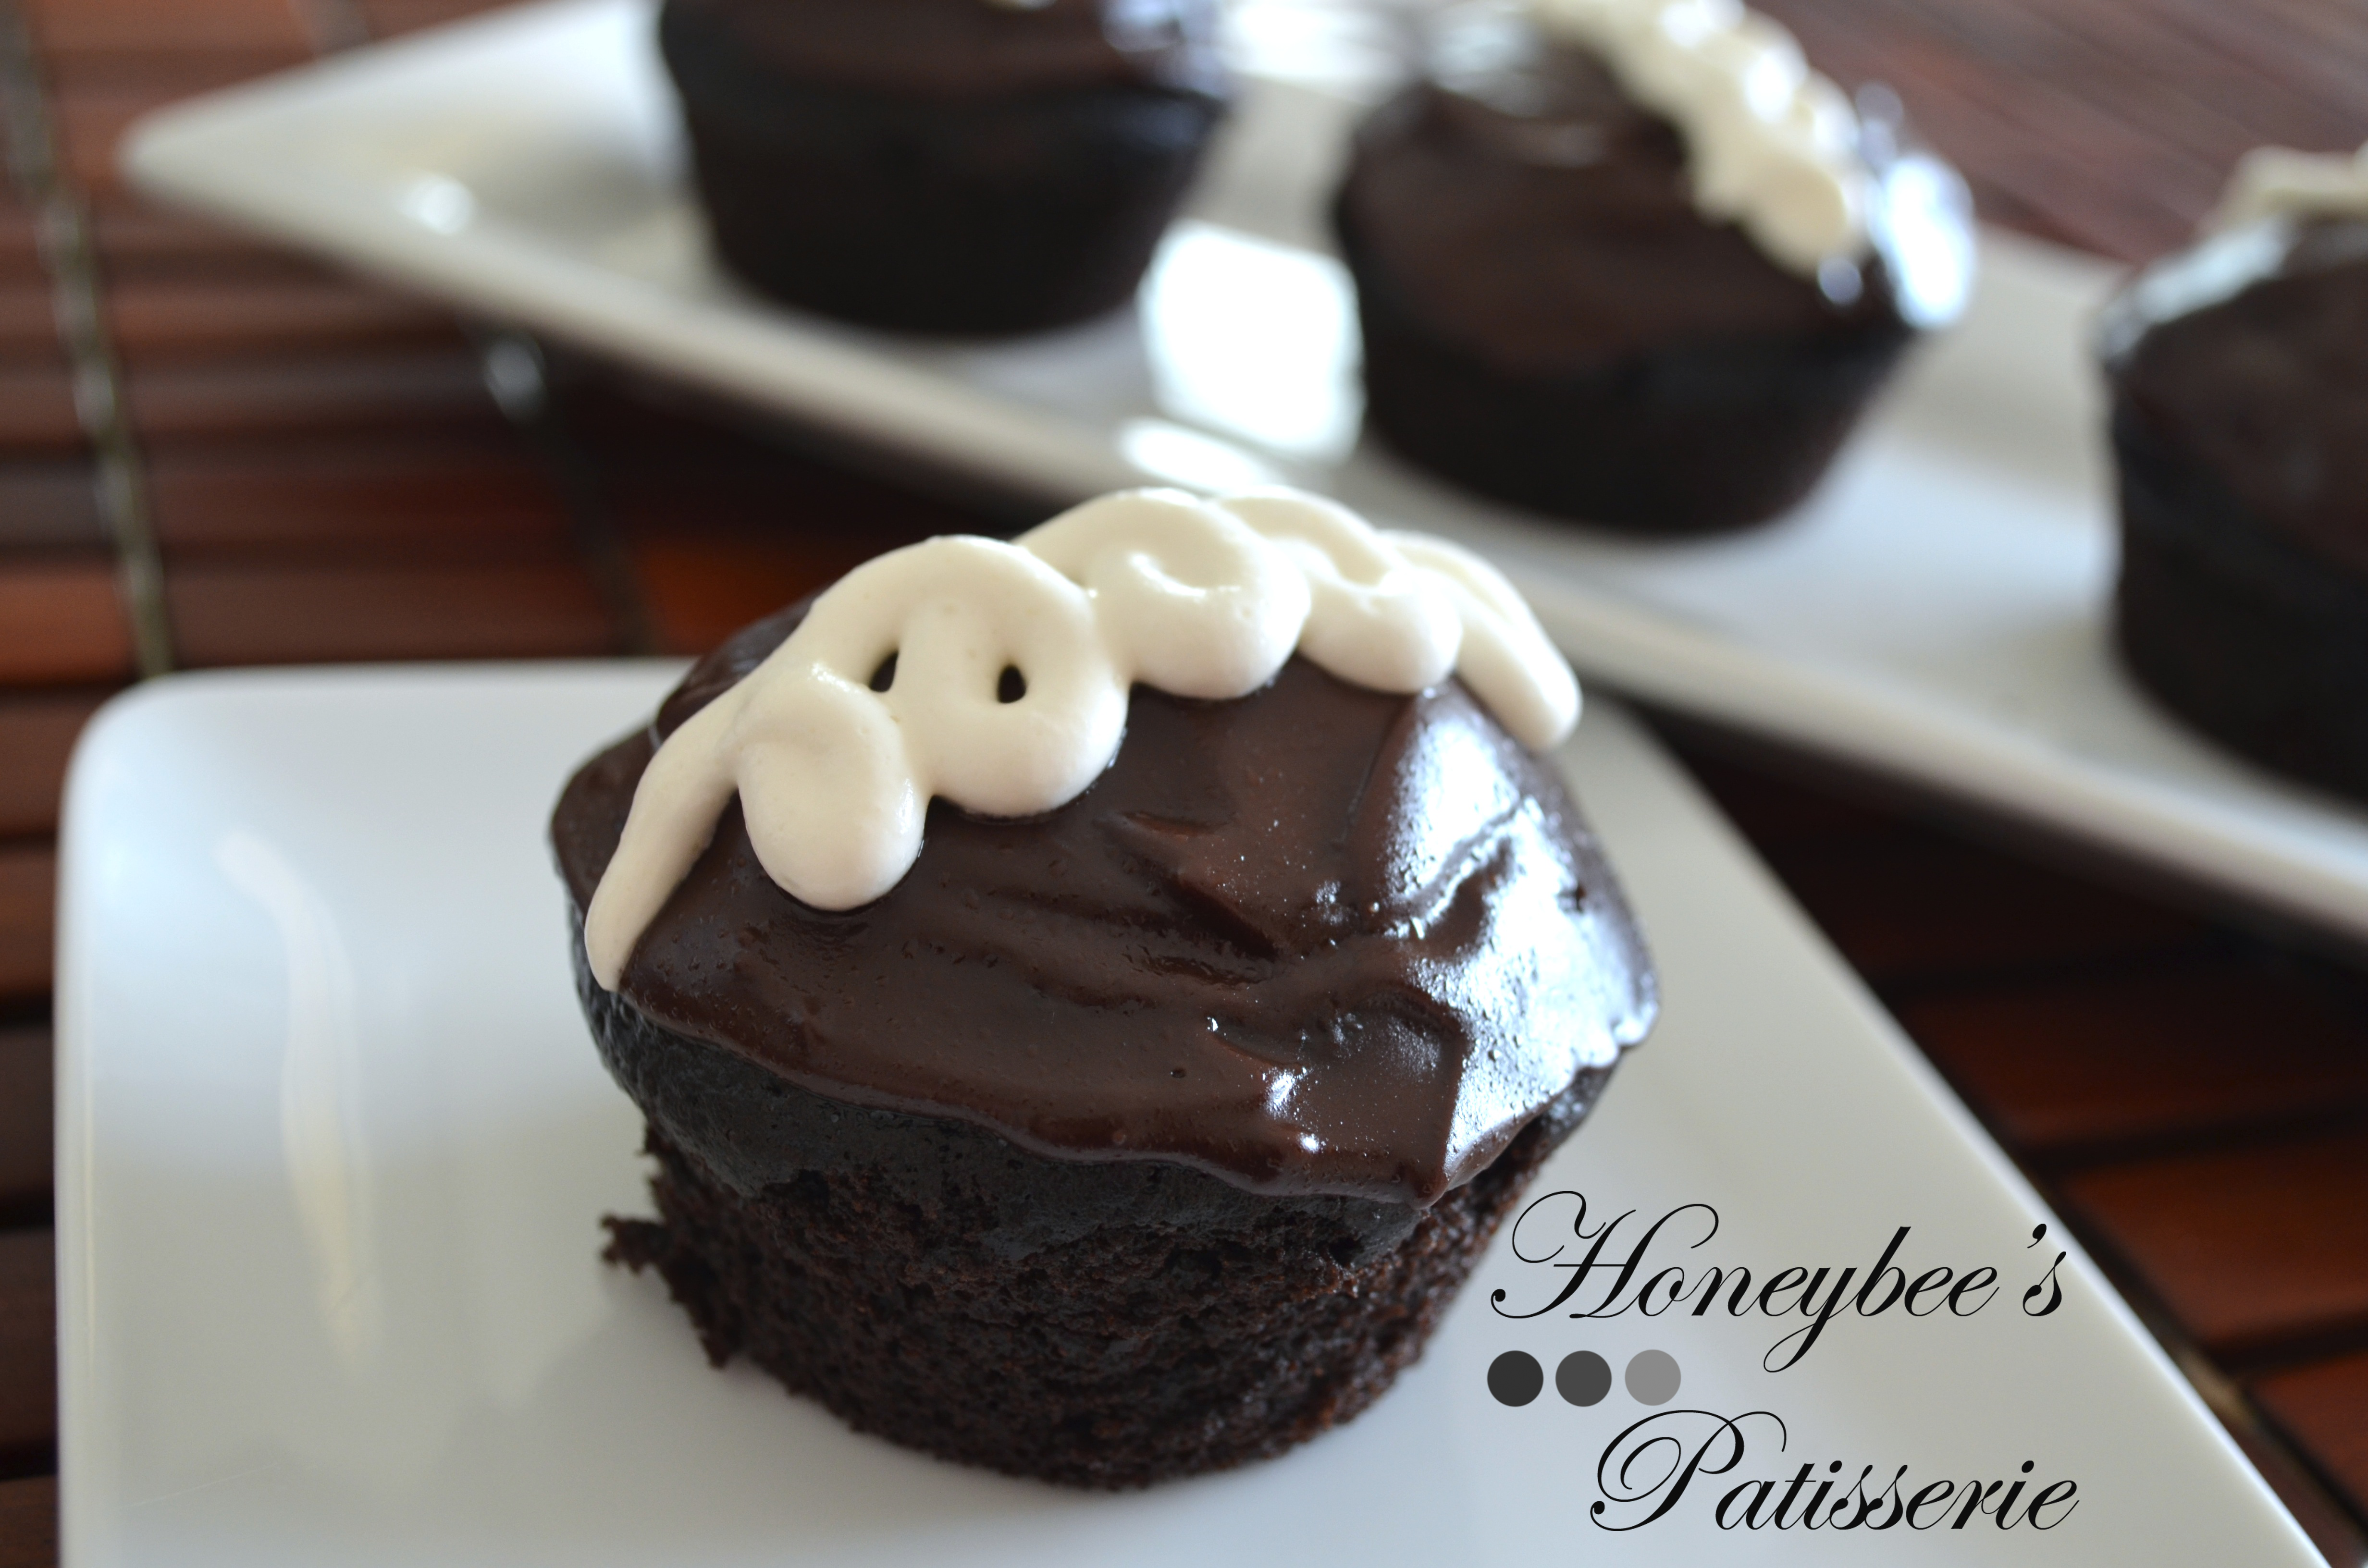
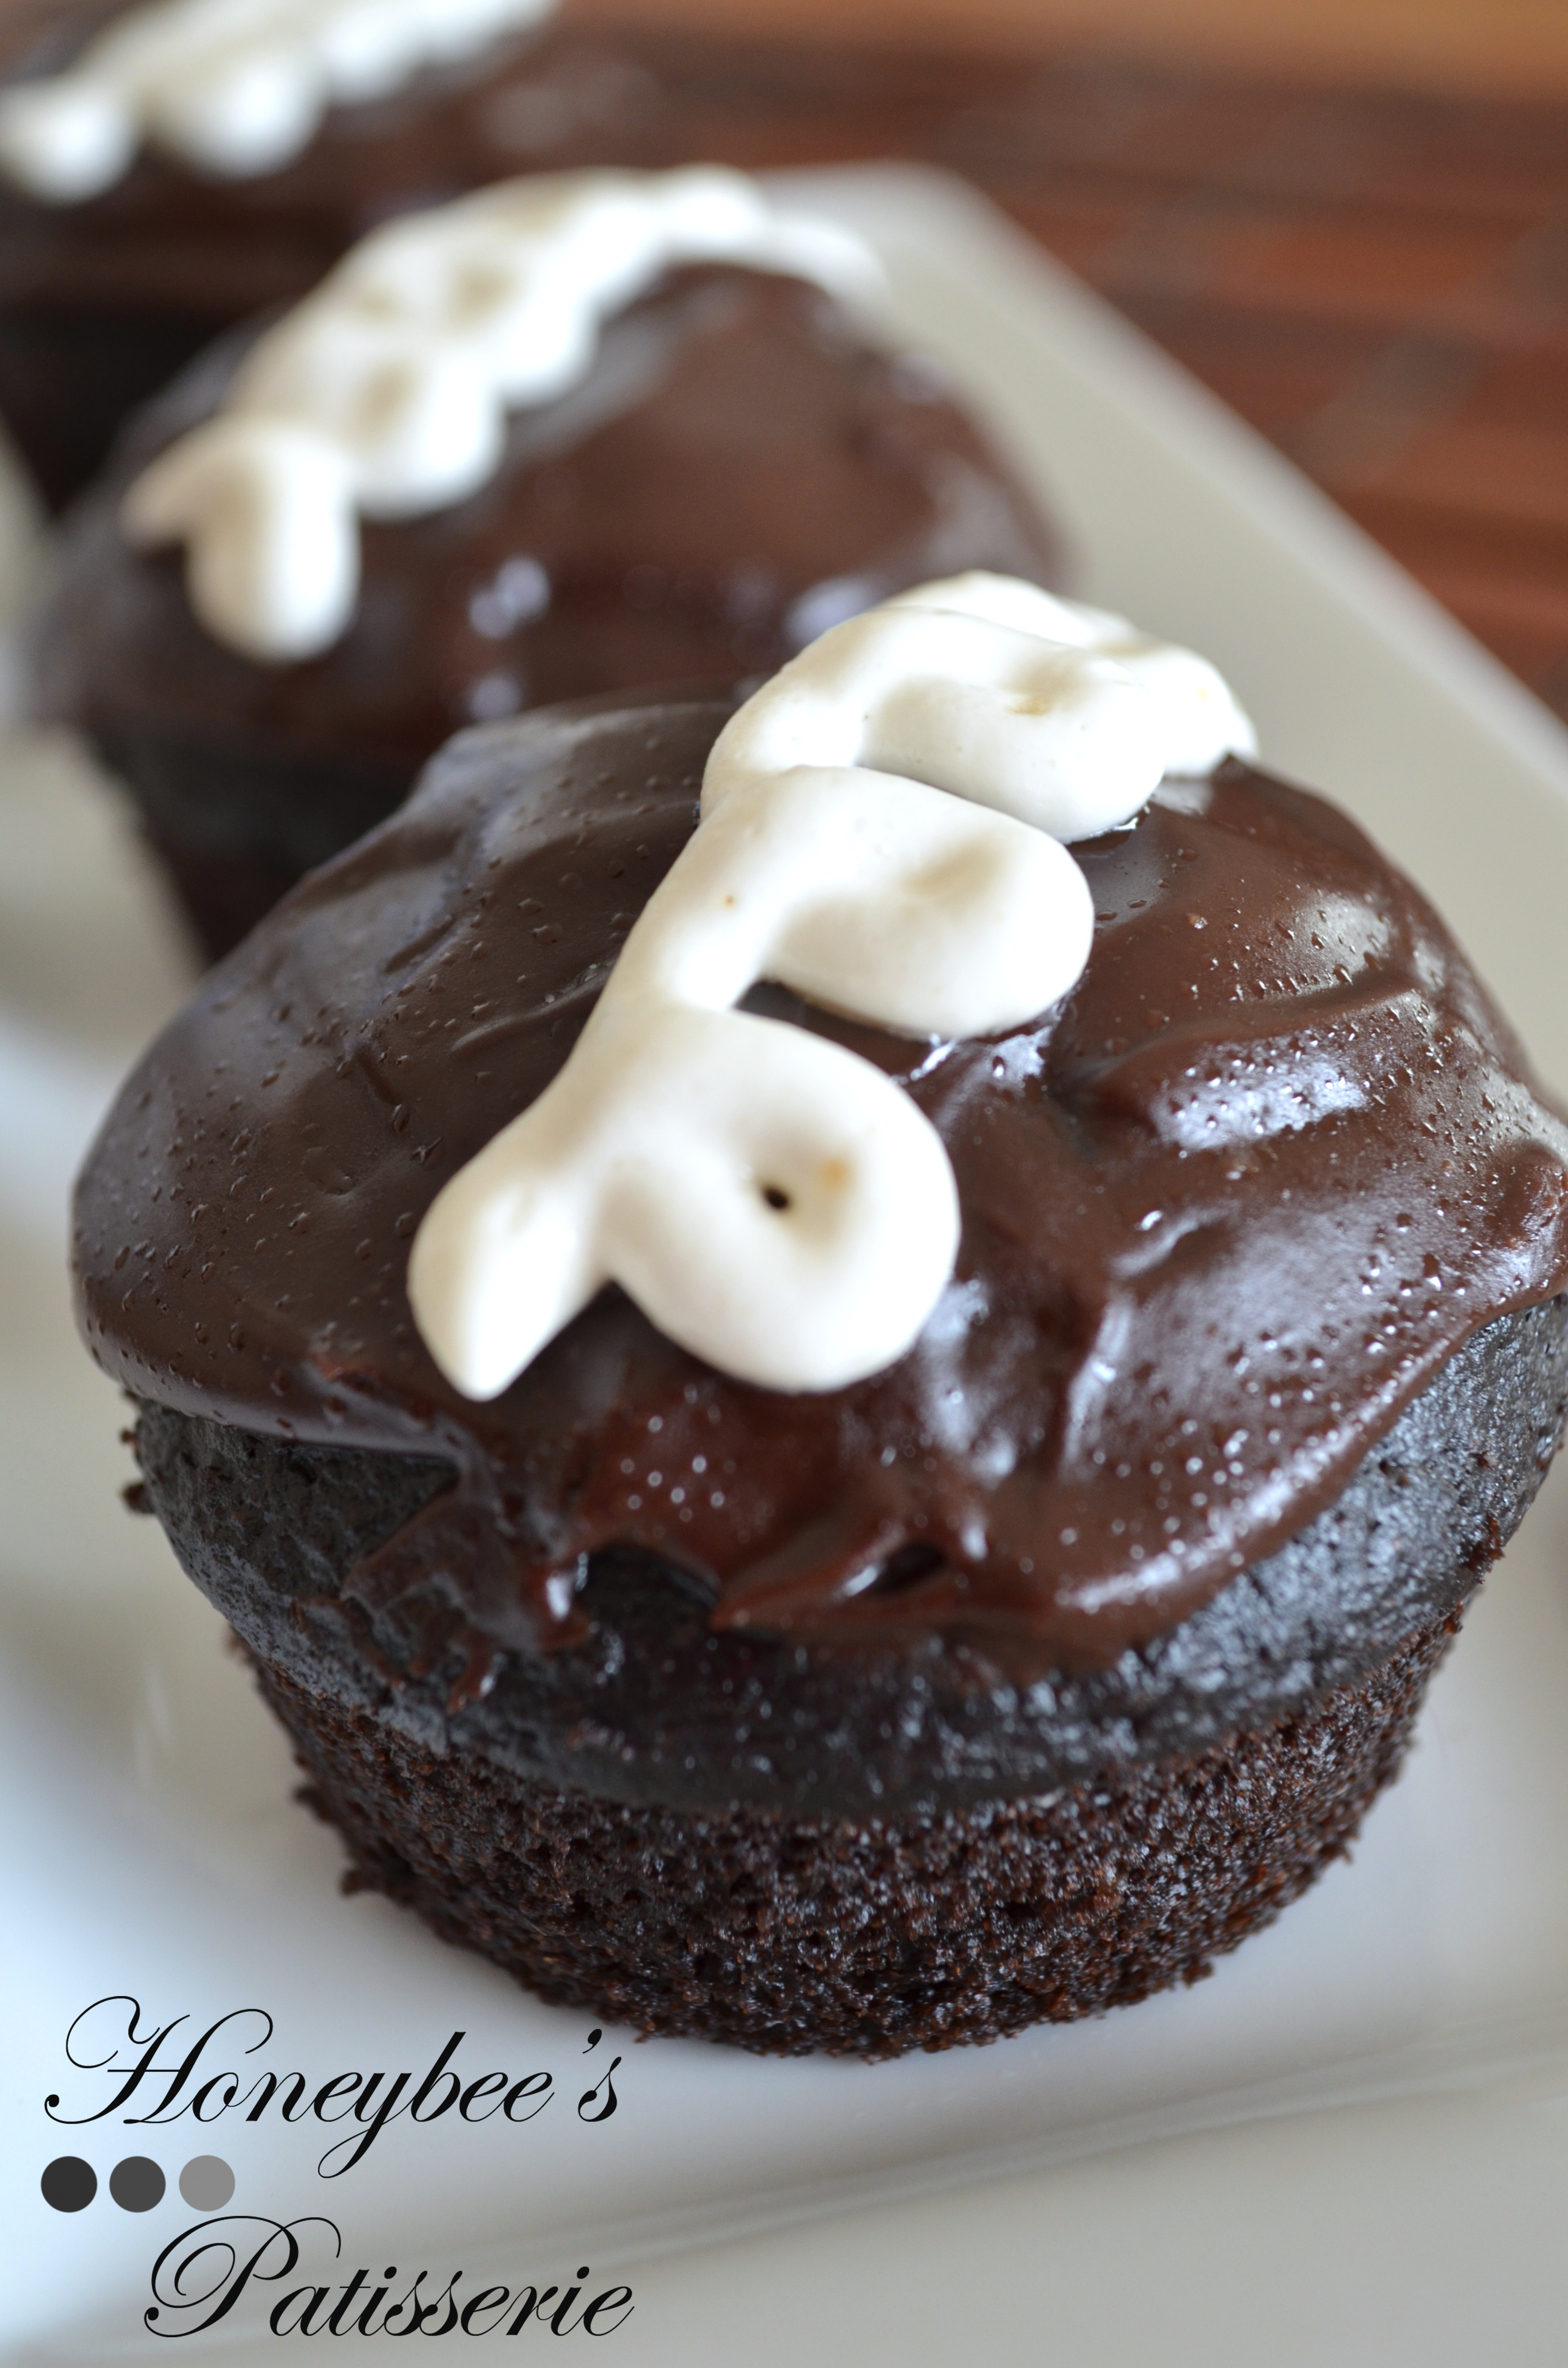
CUPCAKE ASSEMBLY: Microwave the chocolate and butter in a small bowl, stirring frequently until smooth, approximately 30 seconds to 1 minute. Cool the glaze to room temperature, approximately 10 minutes. Meanwhile, cut cones from the top of each cupcake and fill the cupcakes with 1 tbsp. of filling each. To cut the cones, insert the tip of a paring knife into the cupcake top at a 45 degree angle about 1/4 inch from the outer edge of the cupcake. Cut out and remove the cone from all 12 cupcakes. Cut off the bottoms of each cone, leaving a 1/4 inch circle of cake. Discard or eat the bottom portions of all 12 cones. Use a spoon to fill each cupcake with 1 tbsp. of marshmallow mixture. Once all of the cupcakes are filled, top the filling with the reserved circles of cake to plug the center. Once the tops are replaced, frost each cupcake with the cooled glaze using an offset spatula. Allow the glazed cupcakes to sit and harden for approximately 10 minutes. Using the pastry bag filled with the reserved marshmallow mixture, pipe curlicues across the tops of the glazed cupcakes. Serve immediately or store in a sealed container at room temperature for 2 days.
RECIPE ADAPTED FROM: CALI RICH
PHOTOGRAPHY & STAGING: PETER MENDOROS

